Linksys Velop Mesh Setup – A Whole-Home WiFi Solution
Got a state-of-the-art Linksys Velop Mesh WiFi System for your home but are not sure how to get started with it? Or are you encountering some issues while establishing a connection with your Linksys Mesh WiFi router? Well, the wait is over. We have a fast, affordable, and reliable solution for you. Connect to our dedicated technical support team at +1 716-992-6371 or support@linksys-wifi.com now to acquire quality remote tech support delivered to you right away.
Faster Data Transmission and Extended Network Range
Linksys Velop Mesh is the brand’s first whole-home wireless WiFi solution that provides faster data transmission and extended network range for a better internet experience as well. It is a perfect solution for those homeowners who usually encounter weak and unstable internet connection issues at their homes.
The Velop Mesh WiFi router from Linksys is a WiFi 6 wireless network device. It operates on two bands including 2.4 GHz and 5 GHz frequencies. Hydra, Atlas, and MX are the three categories of this wireless WiFi device.
Specifications for a Velop Mesh Router may vary depending on its model, technology, and other factors. However, features and functionalities will almost be the same for all Linksys Velop WiFi models.
Features and Specifications of Linksys Velop Mesh WiFi Router
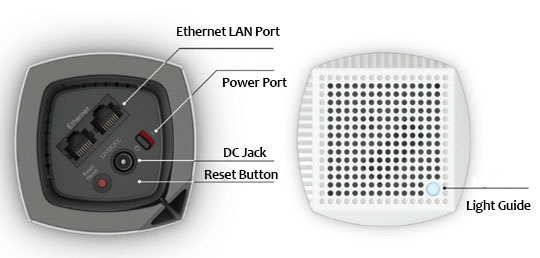
Ports
Ethernet LAN Ports- There are 3 to 4 Gigabit LAN ports in the Velop Mesh WiFi router that you can utilize to connect your devices (computers, mobile phones, tablets and laptops) to the router.
One WAN Port- You can find one WAN port (internet port) on the rear panel or the bottom of the nodes. You need to use this port to connect your modem to the Velop device using an ethernet cable. The ethernet cable is the main concern here as it determines the flow of internet supply. So, first of all, make sure that the cable you are about to use is not damaged in any way and working properly.
One Power Port- Linksys provides one power port at the bottom or back of the device. You need to attach one end of the power cable to this port and the adapter end of it to a power socket. The power supply is provided to the router via this port.
One USB or Hard Drive Port- This is an additional port Linksys gives on its Velop Mesh routers. If you want to attach an external hard drive to your Velop Router, you need to use this USB port.
Buttons And Switches
WPS Button- One WPS button is present in all Linksys Velop Mesh routers. The location, size, and shape of the button may vary from one model to another. This button is for setting up the router with just one push.
Reset Button- The reset button is present near the WPS button in the router. If you want to factory reset your Velop router, you simply need to press and hold this button for 6-10 seconds. Your device will automatically process the factory reset.
Power Switch- The power switch is present in the router close to the Reset button. Use it to power on or off your device.
Connection Status LED
Linksys provides one connection status LED at the top of the Velop Mesh router. This LED lights differently and indicates the connection status of the router. Here is how the connection status LED lights up:
| LED Status | Router Connection Status |
|---|---|
| Unstable or Blinking Blue Light | Your Linksys Velop Mesh router is getting powered on. |
| Stable Blue Light | Your Velop Node is powered on and connected successfully. |
| Unstable or Blinking Purple Light | Velop router setup is in progress |
| Stable Purple Light | Your device is set up and ready to broadcast the signals |
| Unstable or Blinking Red Light | Your Velop router hast the connection |
| Stable Red Light | No network supply from the modem |
| Stable Yellow Light | Weak or slow internet connection |
Antennas
Some Velop Mesh nodes come with fully adjustable omnidirectional or high gain antennas while others don’t have antennas. If you purchase a Velop mesh router with antennas, you will get two omnidirectional or high gain WiFi antennas.
Linksys Velop Mesh Node Body Design
Velop Mesh nodes from Linksys especially come in two different designs including Flat & Wide and Tall & Slim. Both designs give a premium look to Velop Nodes. However, nodes with tall and slim designs look more compact and attractive. It is available in white color and doesn’t include WiFi antennas.
Linksys Velop Mesh Login Using Linksys Smart WiFi
Generally, Linksys recommends using the Linksys App to access the Velop Mesh WiFi log in page and to perform the login because everybody has their phone on them all the time and operating their whole network systems with it is easier and in reach. However, if you want to access the login page using the LinksysSmartwWiFi.com, here are the instructions you need to follow:
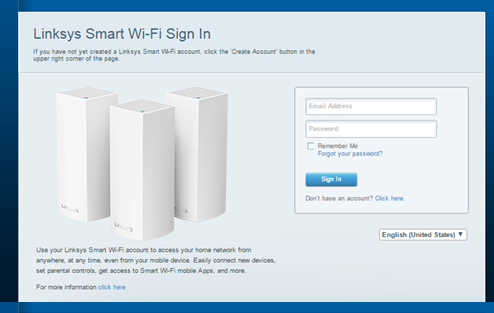
That’s the main Linksys Velop Mesh WiFi login process. You may also utilize other methods to conduct the login process.
Easy and Hassle-Free Linksys Velop Mesh Setup
Setting up a Linksys Velop Mesh router is not rocket science. It is an easy and hassle-free process which can be completed in no time once understood properly. If you do not have much knowledge of it, you must consider the quick installation and setup guide that Linksys usually provides along with its Velop kits. Read all the instructions carefully and thoroughly and perform the setup accordingly. If it doesn’t help, we are here to provide you with complete assistance for every single question you have. We have a bunch of highly trained tech support professionals on our team who will provide you with a step-by-step guide to setting up a Velop Mesh router. It won’t take you more than 5 minutes to successfully complete your router setup. You only need to reach out to us via chat, email, or voice call. We guarantee to provide you with the best and most affordable technical support.
Follow These Steps to Setup Your Linksys Velop Router
Linksys provides different options for configuration so that users can complete the setup process easily and in a hassle-free way. WPS (WiFi Protected Setup) is the easiest way to complete Linksys Velop Mesh Setup. While using this setup method, you simply need to follow these simple steps:
Once you perform all these steps, your Velop node will take not more than 30 seconds to establish a connection.
Effective Fixes For Linksys Velop Mesh Technical Errors
Like other WiFi routers, extenders, and access points, Linksys Velop Mesh may encounter certain technical errors. The most common technical errors that may occur include Velop mesh can’t connect to the closest node, can’t access the Velop mesh portal, no internet, connecting to the wrong device, etc. There could be many other technical errors that you may come across. It is important to identify them correctly and timely. This will help fix the job for you smoothly and quickly.
The following are some brilliant fixes that will most likely resolve the Linksys Velop Mesh error that you are facing:
Connect to Us Now

In case the WPS setup option fails, you can try the web-based setup option. You will find the process in your router’s manual or quick setup guide. But if both options fail or if you do not want to bear such frustrating headaches, consider talking to our team of technical support experts.
Dial +1 716-992-6371 on your dial pad to quickly reach out to us and get tech support delivered in minutes. If our representatives are unavailable at the moment you try to contact us, you can also send an email to us at support@linksys-wifi.com.
Some Issues You Might Face
- Velop Dropping Issue
- Fix Linksys Velop Red Light Issue
- Velop Node Keeps Going Offline
- Fix Linksys Extender No Internet Issue
- Linksys Velop Setup Issue
- Linksys WiFi Extender Not Working
- Linksys Extender Not Connecting to the internet
- Linksys Port Forwarding Not Working
- Linksys Router Red Light
- Linksys Velop Node Blinking Red Or Connected But No Internet
If you are facing any issues then please contact us, and we will be happy to help you.