Linksys RE6700 Setup
The Linksys RE6700 setup process is as simple as a child’s play. This is an advanced wireless WiFi network system that is designed to cover an extended area of up to 9000 sq. ft. and up to 15 devices. Despite its highly technological design and built, surprisingly, there is no need to use any configuration software or setup CD to complete the configuration process. You can do the Linksys RE6700 setup by using the simple methods of WPS and Web-Based Setup processes. However, users must know some essential key points to configure the extender efficiently and effectively without wasting any additional time.
Let’s go through those foremost points.
RE6700 WiFi Extender Overview
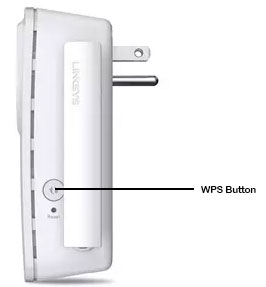
The Linksys RE6700 WiFi extender does not contain any complex button features which prevents the confusion and chances of pressing the wrong button. There are mainly two buttons on the extender which are the WPS and the Reset button on the right side. Then, there are two antennas on both sides. At the bottom, there is an Audio and Ethernet port. Lastly, the front panel has an LED indicator that shows different colours to indicate the different stages of the device’s working and various issues.
| Colour | Purpose |
|---|---|
| Blinking Green | The extender is booting up. |
| Blinking Amber | Disconnected from the router. |
| Solid Green | Ready to use. |
| Solid Amber | Weak connection with the router. |
Setup Methods For RE6700 Extender
Generally, there are two Linksys RE6700 Setup ways, the Web-Based and WPS processes. But, keep in mind that you will require a WiFi router, a power plug, and any device during the setup. Let’s dig a little deeper into the setup process for your better understanding.
Using a Web-Based Method For Linksys RE6700 Setup
Thus, the launching process is complete and the extender is ready to use.
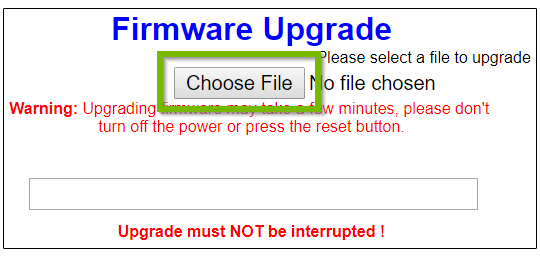
Note: During the Web-Based Linksys RE6700 Setup, you can allow the extender Auto-Update. The extender will update and install automatically by this option. Otherwise, you can update the extender manually.
By WPS Method
Besides the above method, you can also utilise the WiFi Protected Setup process. But, make sure that your router has a WPS button. Follow the directions for stepping further into the procedure
Besides the above Linksys RE6700 Setup method, you can also utilise the WiFi Protected Setup process. But, make sure that your router also has a WPS button. Follow the directions to proceed further
App Setup Method For RE6700 Extender
Apart from those setup approaches, there is another method which is the Linksys WiFi app setup. But, this method will prompt you to install the Linksys WiFi app on your smartphone either on Android or iOS. So, get the app and follow the directions given below
Connect by Using the Extender’s PIN
To connect your other device with the extender by WPS process, take the extender’s PIN from the product label. Follow these points to make the connection
Connect by Using The Device’s PIN
To connect with another device, make it clear that the device has a WPS function.
Note: Ensure that the extender must get at least 50% signal of the router during the configuration. After that, you can move the extender to the desired location by keeping it within the range.
Linksys RE6700 WiFi Extender Settings Interface
You can change any advanced settings of the extender, once the Linksys RE6700 Setup is complete. In order to change and save the settings, you must click on Save Settings to apply the changes. Open a web browser on the device and visit the Linksys RE6700 setup page. Use the default web or IP address to visit the page. On that page, you can make the changes.
Note: If you do not click the Save option, then changes will not save and apply. On that page, you will also see the Cancel option to discard the changes.
Special Features of RE6700 WiFi Extender
Although the Linksys extender has all up-to-date features similar to the other extenders. But, music streaming and a built-in power outlet make this extender different from the others. The Linksys RE6700 WiFi extender contains these two amazing features. Read the information to learn more
Inbuilt Power Outlet
On the front panel of the extender, there is an additional power outlet. It works like a normal electric socket and is not controlled by the extender. Clearly, you don’t need to look for any vacant power sockets.
Music Streaming Feature
With the help of this function, you can stream the music on the connected speakers through the extender. After connecting your device to the WiFi network, open the media player and select the Linksys Range Extender from the Select Device list.
Facing Issues While Using RE6700 WiFi Extender
In any case, the Linksys extender stops working due to any reason. Then, apply these Linksys RE6700 Setup troubleshooting tips to solve the issues
Note: The Spot Finder helps to analyze the signal of the extender. Basically, it shows the gap between the router and the extender. If the distance is too far or too close, then relocate the extender in the middle.
Silly Mistakes to Avoid During Linksys RE6700 Setup
Performing and finishing the Linksys RE6700 Setup successfully is essential. Or else, you might not be able to use your brand-new Linksys RE6700 device. You usually get the manual along with your Linksys RE6700 kit. You either refer to that manual for the setup instructions or get help from the tech experts. But, here it is crucial to keep in mind that there are a few silly mistakes that users usually make. You must avoid them or you can also be one of those users who usually end up with the mess. Here are the common silly setup mistakes that you need to avoid:
Placement Error
Correct placement of your Linksys RE6700 is the key to access wider network coverage and faster internet speed. Check the user manual of the Linksys RE6700 device. You will find the instructions over there. Consider those instructions to avoid network flaws and Linksys RE6700 Setup issues. Usually, wireless network brands like Linksys suggest users place their host devices and add-ons close to each other. Both devices must be connected through an ethernet wire. They must be in a place lacking electronic gadgets and nearby walls or floors. The central location or a place near the central location of your place would be the best space to place your device.
Incorrect Antenna Position
Antennas of any device that transmits radio waves should be positioned upward pointing towards the sky. If you do not fix the antennas in their ideal position, you will most likely encounter network interference. So, make sure to adjust your Linksys WiFi extender’s antennas in the right position.
Loose Wired Connections
In some cases, it’s been found by our tech wizards that users usually do not establish a firm connection between devices. They leave the attached wire loose, resulting in no internet connection or no host router network found. So, when you get into the Linksys RE6700 Setup process, make sure that you have attached the wires firmly and there is a successful connection between devices.
Some Issues You Might Face
- Velop Dropping Issue
- Fix Linksys Velop Red Light Issue
- Velop Node Keeps Going Offline
- Fix Linksys Extender No Internet Issue
- Linksys Velop Setup Issue
- Linksys WiFi Extender Not Working
- Linksys Extender Not Connecting to the internet
- Linksys Port Forwarding Not Working
- Linksys Router Red Light
- Linksys Velop Node Blinking Red Or Connected But No Internet
If you are facing any issues then please contact us, and we will be happy to help you.