Linksys RE1000 Setup

Live Chat

Live Chat with our experts & get real-time answers to all your queries.

Any Query?

Call us to discuss your Linksys issues with our experts and get the solution.

The Linksys RE1000 setup is a straightforward and effortless process with the CD setup method. Moreover, you can also execute the installation by using the WPS and Web-Based ways. But, in order to do the Linksys RE1000 Setup smoothly, users must know the whole criteria with every single detail and some additional key points.

Let’s dive into the entire procedure.

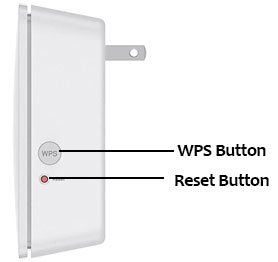
Linksys RE1000 WiFi Extender Overview

To make the Linksys extender setup easier, go through the extender’s several buttons and their functions. The Linksys RE1000 extender contains mainly two or three buttons and an Ethernet port. Here is the complete overview of the extender

  • On the front, there is a light indicator that shows its activity. Different lights indicate different scenarios. You must know the whole context of every light to understand the working stage and the issue it is trying to indicate.
  • At the top, there is a Reset button along with the WPS button.
  • Besides that, there is an Ethernet port at the bottom of the extender.
RE1000 WiFi Extender Setup

Prerequisites of Linksys RE1000 Setup

Before launching the extender, just look once for all the things which you are going to require to perform the Linksys RE1000 Setup. Go through the list carefully and arrange the items accordingly.

  • First of all, A setup CD and user manual guide which you will get along with the extender.
  • A WiFi router with an efficient internet connection.
  • Any updated PC or other device to access the Linksys RE1000 setup page.
  • In addition to that, an ethernet wire which is not damaged in any way is also on the requirement list.

You are advised to keep these things ready as it will save your time and make the process smoother as well. Now, let’s jump to the Linksys RE1000 setup key points.

Steps For the Linksys RE1000 Setup Process

Basically, there are three ways by which you can do the extender configuration successfully, these are the CD setup, Web-Based setup, and WPS processes. Read all of the instructions carefully for every Linksys RE1000 Setup procedure.

Use The Setup CD

  • First, Place the PC near the router and make the connection between them by WiFi network.
  • Following this, Insert the Setup CD into your PC and start the Setup process.
  • Then click Next by marking agree on the license terms.
  • Now, plug the extender into a power socket and it will search for the Wireless networks automatically.
  • Thereafter, choose your network, insert the password into the prompted box, and lastly, click OK.
  • Finally, the Linksys RE1000 setup is done and ready to use.

Using WPS Setup

The WiFi Protected Setup is another convenient way to do the Linksys RE1000 setup. You can make the connection by using the WPS buttons on the router and extender. Make sure that your router has a WPS function. Use these directions to complete the process efficiently without any additional hassle.

  • First, plug the extender into the power outlet close to the router. Ensure the power outlet is working properly and has an optimum supply of electricity.
  • Afterward, press the WPS button on the router.
  • Then press the extender’s WPS button immediately.
  • After the connection, the extender’s light will be lit constantly.
  • This means the Linksys RE1000 setup is done successfully.

Connection With Client Device Using PIN

In case, you do not want to connect via the WPS function or your host device does not have the WPS feature then you can connect them through the method we are going to explain.

  • To begin with, open the Linksys RE1000 setup page and fill in the login details.
  • You must have collected your login credentials by now but if not then check the label at the bottom of your device. It must have all the information you will to complete the login like your SSID and password.
  • Furthermore, go to the Wireless option and insert the PIN of the client device.
  • Tap Register on the page and thus, the connection is complete.

Connection by Using Extender’s PIN

To use this service, take the extender’s PIN from the bottom of the extender.

  • After login on to the Linksys RE1000 setup page, select the Wireless option.
  • Choose your device
  • Fill in the Extender’s PIN in the field.
  • The PIN consists of 8 digits. You must keep that in mind to avoid any mistakes while typing.
  • Once you are done inserting the PIN, click OK on the page.
  • In this way, the client’s device is connected to the extender.

With Browser-Based Setup

Apart from these two processes, the Linksys RE1000 setup or extender installation can be done using the default Web or IP address. Utilize any updated internet browser on a PC to proceed further

  • First, Join the extender to your PC with the help of an Ethernet wire.
  • Thereafter, visit the default web address or type the 192.168.1.1 IP address or extender.linksys.com on a web browser.
  • Make sure you are typing all the digits accurately if you are choosing the IP address to proceed further. Because a single mistake can lead to failed loading of the page or redirect you to the wrong one.
  • On that screen page, enter the extender’s username and password.
  • Start the Setup and use admin as the password in the login interface.
  • In the end, click OK to complete the login process.

Linksys RE1000 Extender Setup Browser-Based Utility

Once the Linksys RE1000 Setup is complete, you can change the advanced settings of the extender by using the browser-based utility. However, to change and save the settings, you must click on Save Settings to apply the changes you have made. To open the Browser-Based Utility on different devices, follow the instructions

For Microsoft Windows XP PC

  • Firstly, tap My Computer from the Start option.
  • In the second step, click My Computer Places.
  • The RE1000 icon will appear on the right side.
  • Go to properties after Right-click on RE1000.
  • Check the extender’s IP address and double-click on the icon.
  • The username and password box will appear directly on your browser.

For Mac Device

  • Open Safari on your Mac and tap “Book Icon”.
  • You will see the RE1000 picture there,
  • After that, double-click on the book icon.
  • The username and password box will open.
  • Enter admin in the password field and leave the username field blank.
  • Lastly, tap OK and you will log in successfully to the Browser-Based Utility.

Keep The Firmware Updated On The Extender

An outdated version of the extender’s firmware can lead you to face some serious issues in the performance of the extender. To avoid them, update the version on time or whenever you get the latest file on the web interface. By doing so, your extender will keep working flawlessly preventing technical glitches and time wastage.

  • Access the Firmware Update page on the Linksys web interface. Go to the administration Settings and click on the FIrmware option.
  • See the new version availability for your extender model.
  • Download the file on your networked PC and store that safely. Ensure the file is not corrupted.
  • Visit the same page again and upload the file to the required field.
  • Click on the Firmware Update option and wait till the process finishes.
  • Finally, reboot the extender, and make the connections again.
  • You can also set the firmware update to automatic mode. It will save you from checking the updates from time to time and will update the firmware automatically whenever the latest version is available.

Now, check the extender performance whether it is working optimally or not. You can also activate the Auto-Update option on the Linksys WiFi app for the same purpose.

Facing Errors While Using Linksys RE1000 WiFi Extender Setup?

In any case, the Linksys RE1000 extender stops working or gets disconnected due to any reason. Try these potential troubleshooting points to fix the error

  • First, Verify the light indication and connection of the extender.
  • Check that your device is connected to the router or not,
  • Try alternate locations to avoid signal disruptions. Use the spot finder feature of Linksys if you are not able to choose an appropriate place.
  • Keep your extender away from other electronic devices.
  • Place the extender near the router to get a strong signal.
  • If there is any need, reset the extender.
  • Press the reset button for 10 seconds to reset the extender.

You can create the configuration settings’ backup before resetting the extender. Later reset the extender, and restore the backup without doing the Linksys RE1000 setup again.

Effective Fixes to Resolve Common RE1000 Setup Issues

Every wireless WiFi network owner encounters complex issues like being unable to log in to the extender portal, can’t connect to the closest node, connecting to the wrong device, incorrect user ID or password, etc. All these issues are frustrating and can waste a lot of your precious time. If you want to avoid these Linksys RE1000 setup issues or eliminate all the possibilities of potential obstacles, try out the following fixes:

Change Host Network

Sometimes, a poor host network spoils the entire WiFi network. Check with your Internet Provider and identify whether your host network is creating an issue in your entire network or not. If not, continue with the same and try to detect the actual issue in your network system. But, if the problem is the host network only, change it right away. Show your trust in Linksys devices as they are typically the best performers.

Make Security Stronger to Avoid External Threats

External attacks often lead to corrupted software and information leaks. This usually happens when you do not have a stronger security system for your Linksys RE1000 Extender Network. We recommend you emphasize making your WIFi security stronger by setting up a hard-to-guess password. The password must include a combination of letters (capital and small), figures, and special correctors and it should at least be 8 characters. Another thing is that you need to change your extender portal’s password so often.

Regular Network Inspection

Regular network inspections keep your wireless WiFi network healthy. These are helpful in detecting the potential threat and damage. If you know the potential threats to your network, you can always make necessary modifications to the network to avoid complex issues. So, take help from remote support experts and do regular network inspections.

Frequently Asked Questions

Insert the setup CD into the optical drive of the PC and plug the extender into the power outlet. Then start the Setup Process on the PC. Select your wireless network from the list and enter the network password. In the final step, click OK to finish the process.
Apart from the CD setup, you can use the WPS or Web-Based Setup. For WiFi Protected Setup, press the WPS button of both the extender and router. And for web-based, use the default web or IP address on the device’s web browser.
You can check the connected wireless devices to the extender on the web-based setup page. In the first place, go to the status on the web-based setup page. In the next step, click WLAN Clients Table under WLAN Statics. More than that, you can also check the MAC address, names, and HOP number information on this page.
You can change the extender’s inbuilt power plug into the wall power socket. Press the latch from the back of the extender. Release it by sliding upward. After that, connect the AC wire to the power connector.
You can reset the Linksys RE1000 extender in two different ways. In the first case, press the reset button for 10 seconds and wait for its factory default settings. On the other hand, go to the Administration on the web-based setup page. Click Restore Factory Default to reset it.