Linksys Velop AC2200 Setup
The Linksys Velop AC2200 setup is a device that can enhance your existing internet connection performance effectively. Though the Linksys Velop node can be configured in two or three ways, you must be familiar with the setup’s essential required things and key points. Let’s go through these points to execute the process conveniently.
Configure The Linksys Velop AC2200 Setup On App
The first and preferable method to do the Linksys Velop AC2200 Setup is by installing the Linksys app on your device. To use this method, install the Linksys official app on an Android mobile or iOS device. The app offers an easy operational process for example you can check the internet speed and devices connected to the velop. In addition to that, you can customize all the settings with a few clicks and most importantly the parental control feature can be performed effectively. Later, follow these directions for app-based login.
Linksys AC2200 Setup Through The Web Interface
The second method besides the app-based method is through the web portal which will offer the same features. The only thing you need to do first is access the portal on the networked PC or laptop. Then, execute the points as mentioned below:
Linksys Velop AC2200 Setup LED Indications
The LED on the top of the Velop node represents different indications about its connection and working. Have a look over these LED signs to identify the Velop’s working.
| Color | Purpose |
|---|---|
| Blinking Purple | This means the Velop node is processing the setup. |
| Stable Purple | Indicates and makes the Velop ready to configure. |
| Unstable Red | The node is out of range or not getting signals. |
| Solid Red | Your Velop node is disconnected from the router. |
| Blinking Blue | Indicates that the node is switching on. |
| Strong Blue | The Linksys Velop is safely connected to the internet. |
In order to get an uninterrupted signal continuously, check the Linksys Velop AC2200 Setup LED color often. In case, your node gets any error in working, you can utilize these points.
Resolving Tips For Linksys Velop Node Errors
In any case, if you get an error in the Linksys Velop AC2200 Setup working and are not able to find the reason. First, you do not have to worry about it as velop is a machine that needs accurate setup steps and you being a newbie can make some mistakes. But, to fix this, verify the Velop and router connection by checking the LEDs on both. Unplug both devices if the lights are not stable and make the connection again. Meanwhile, disconnect your device from the Velop and join it after plugging in the Velop again. Apart from that, these are some other resolving tips that can you eliminate many issues that you may be facing directly or indirectly.
Reset The Linksys Velop AC2200 Setup
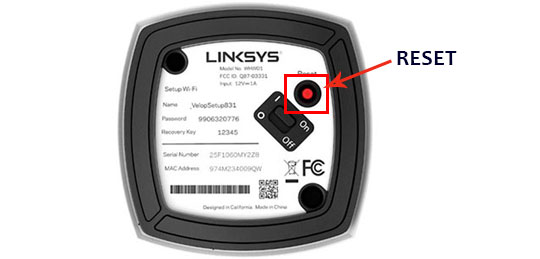
Undeniably, resetting the Velop can be more disturbing as it discards the settings that you have made while configuring it like your ID and passwords. However, to get the errors fixed, this is an appropriate solution and it will surely resolve the issues. Interestingly, there will be no need to use any paperclip or needle.
Update The Velop Firmware to the latest version.
The Linksys Velop’s firmware update will enable it to perform efficiently. For this process, you can turn on the automatic mode of the Firmware feature in the smart app. As a result, the Linksys app will update the version automatically on time without the hassle of checking updates from time to time. Besides that, you can do this manually by downloading the latest file.
Upgrade Firmware Through CA Login
Open the Linksys app dashboard to take the IP address of the Parent and Child nodes as well. Select the Network Administration option for this and move to these steps
We assure you will be successful in configuring your Linksys Velop AC2200 setup by using these tips. If you face any trouble while doing this, you can contact us through the mail option. Call us at +1 716-992-6371 or simply put your queries to support@linksys-wifi.com and we will professionally solve those.
Switching Between Linksys Velop AC2200 Bandwidth
Sometimes, the major reason you are unable to make the best use of your Linksys Velop AC2200 high-speed network is the bandwidth. It might be possible that you are using a device that demands higher network bandwidth while your device is set to 2.4 GHz bandwidth. Similarly, if your Linksys Velop AC2200 network is set to 5 GHz and you are using a device that demands 2.4 GHz network bandwidth, you will most likely face certain technical errors. So, we would recommend you switch between the bandwidths. If your Linksys Velop AC2200 network is set to the low-tier bandwidth, switch it to higher bandwidth. You may get the results right away. If this also does not work, the better option for you will be to connect to our technical support expert. They will help you with this.
Some Issues You Might Face
- Velop Dropping Issue
- Fix Linksys Velop Red Light Issue
- Velop Node Keeps Going Offline
- Fix Linksys Extender No Internet Issue
- Linksys Velop Setup Issue
- Linksys WiFi Extender Not Working
- Linksys Extender Not Connecting to the internet
- Linksys Port Forwarding Not Working
- Linksys Router Red Light
- Linksys Velop Node Blinking Red Or Connected But No Internet
If you are facing any issues then please contact us, and we will be happy to help you.