Linksys Velop Setup With Existing Router
Although there are two-three processes available for the Linksys velop setup, all require proper guidance due to its mesh system. Except for the WPS process, other approaches have some prerequisites and difficult setup points which can be challenging for a new user. So, to get aware of those processes, check out this page’s information and use this precisely.
Along with the WPS process, there are two other methods available for the Linksys velop setup with existing router process. Such as setup through the web portal and by using the Linksys WiFi app. In the first method, there will be a requirement to use the WPS buttons from the Linksys velop and your router. Whereas, the other processes involve accessing the setup window on the networked device’s web browser and the WiFi app. Once you are on the setup portal, this will direct you in the right sequence till you complete the process.
Prerequisites For Linksys Velop Setup
As mentioned above, the WPS process does not require any specific thing except for the WPS buttons. But, there are some mandatory things required to execute another process.
WPS Setup Steps For The Linksys Velop
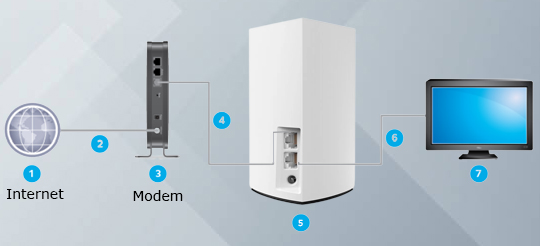
In the first and foremost setup method, that is the WPS process, check your router’s WPS compatibility first, Verify whether its WPS is working or not for the Linksys velop setup with existing router process. After checking this, take the next step into account which is making the velop configurable. Attach the velop and your router together with the help of an ethernet cable and join the other nodes to the velop too.
Meanwhile, make sure to place all these devices ideally, and locate the main node centrally to your place and the nodes in the corner. Then, find the dedicated WPS buttons on the devices and press them separately within two minutes. Wait to see the light indication on the velop node to get the setup confirmation. Here, the solid and stable LED will denote that the Linksys velop setup with existing router is successful.
Web-Based Setup Method For Linksys Velop
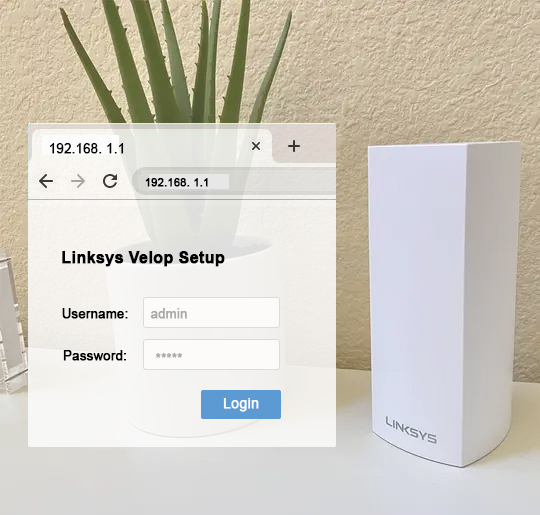
Another way to set up your Linksys velop is using the web setup window and using the screen directions till the end. However, there will be a need to access the setup portal on the networked device. So, utilize these directions for this setup method.
Linksys Velop Setup Through App
In the final setup approach, you will use the Linksys WiFi app after getting it from your mobile’s app store. Interestingly, this method has similar setup points to the web-based setup method. To carry out this process, take your mobile and launch its app store and search for the Linksys WiFi app. Open the app after installing it and log into the velop first to reach the setup window. Follow the directions finally to finish your velop set up in the right manner.
Some Troubleshooting Tips To Fix Velop Errors
Though the Linksys velop will start showing an optimal color once you finish the setup process. But, in any case, if it starts blinking or showing abnormal signs, there could be a fault in its working. To fix that, change the velop and the node’s placement and move them closer together. Also, check the ethernet wires through which those devices are connected. See Velop’s updated firmware version and update it if there is any available. If the issue still persists, then reset the velop and configure it again using any of those methods.
Finally, confirm that you are successful with the Linksys velop setup with existing router process. If you are not, then don’t hesitate to reach out to our technical experts for more help.
Some Issues You Might Face
- Velop Dropping Issue
- Fix Linksys Velop Red Light Issue
- Velop Node Keeps Going Offline
- Fix Linksys Extender No Internet Issue
- Linksys Velop Setup Issue
- Linksys WiFi Extender Not Working
- Linksys Extender Not Connecting to the internet
- Linksys Port Forwarding Not Working
- Linksys Router Red Light
- Linksys Velop Node Blinking Red Or Connected But No Internet
If you are facing any issues then please contact us, and we will be happy to help you.