Linksys Velop Setup
Live Chat
Live Chat with our experts & get real-time answers to all your queries.
Any Query?
Call us to discuss your Linksys issues with our experts and get the solution.
Linksys Velop wireless WiFi mesh is a celebrated network system which is designed to improve your home network. Its setup can be done in a trouble-free way with an ethernet cable and the Linksys smart app. It is not as complex a process as it usually seems. But it needs to be set up properly to enjoy the fastest internet possible. However, before initiating the Linksys Velop setup procedure, make sure that you are familiar with the required basic details and some smart tips to avoid time wastage.
Let’s go through the entire process and some other points.
Velop WiFi Mesh Features
Basically, the Linksys Velop setup fixes the WiFi router’s performance issues by making it strong, secure and stable. Some latest and most powerful features make it possible to enhance the router’s range and internet speed even to the dead WiFi zones. Each Velop node is an AC2200 device. These nodes work as router extenders, bridges, and access points over a single network.
The 802.11 AC network performs on MU-MIMO technology which allows the router to communicate with multiple devices simultaneously. The tri-band network helps to cover the wide area for the WiFi range.
Prerequisites For Linksys Velop Setup
Although the Linksys Velop WiFi mesh setup doesn’t require any specific things, there are certain key points on the requirement list. Beneath-written is the list of these
- Any modem or router with a stable internet connection to support the whole process.
- Ensure all the power outlets, wires and switches are working perfectly fine. Because this error is a little hard to find and can lead to frustration.
- The ethernet cables are not damaged in any way. So, check for any wear and tear as these cables are going to determine the quality of the internet.
- Latest Android or iOS mobile, and any other updated device.
- The updated Linksys smart app.
That’s pretty much all you need for the Linksys Velop setup. Now, let’s jump to the foremost part i.e. setup process.
Linksys Velop Setup Via Linksys App
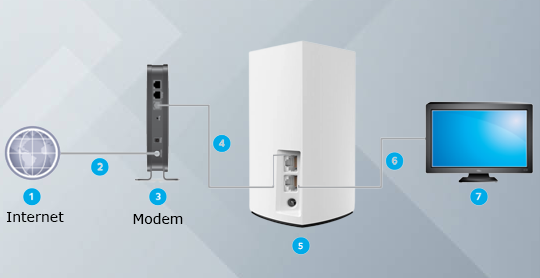
During the unboxing of the Linksys Velop setup, you will get a few things that will be used in the process. These are a user manual guide, the Linksys Velop setup, the ethernet cables, and a power cable. Take the Velop setup and an ethernet cable first and then follow the rest of the steps that are written-below
- Place the Linksys Velop close to the main router.
- Insert one end of the ethernet cable into the Velop’s ethernet port and another into the router’s ethernet port.
- Then connect it to the power plug by inserting the power wire into the Velop setup.
- Once it’s connected to the power socket, the LED indicator turns blue indicating that everything is set to proceed further.
- Now, wait till the main router is done with the booting and make the connection.
- After one or two minutes, the LED on the Velop will show a solid purple color making it ready to use.
- After that, install and open the Linksys app on your device to start the Linksys Velop Setup process.
- Make sure that the version of the app is the latest. Update it if your device has an old version.
- By marking the agreed terms, fill in the email account and password.
- Then, a page will appear on the screen that asks you where the internet comes from.
- Choose your internet connection and open the WiFi list in the Linksys app
- A network name of Linksys Velop Setup will appear in the list.
- Tap on it and fill in Velop’s password, which you will get at the bottom of the Velop node.
Finally, the connection is successful easily. Now you can utilize the Linksys Velop WiFi mesh setup services.
Linksys Velop Setup on Web Portal
Apart from the Linksys Velop setup app method, you can use the Linksyssmartwifi.com page to configure it. But, keep in mind that your node is in factory default settings and the firmware version should be 1.1.1.177892 or above.
Here are the directions to set up the parent node:
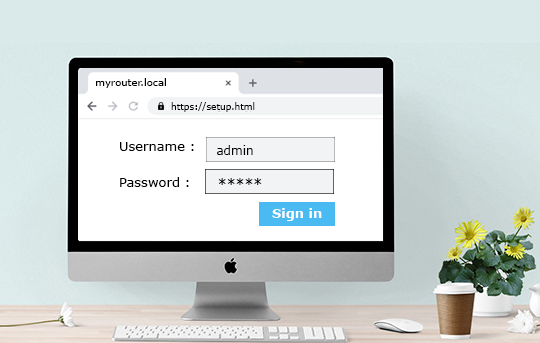
- First, open any web browser and search “https://myrouter.local/”.
- The web browser will directly direct bring you to the “linksyssmartwifi.com:52000/ui/1.0.99.198962/dynamic/velop/blocking.html” page.
- In the address bar, remove the “blocking.html” and type “setup.html”.
- By doing this, a sign-in page will appear on the screen.
- Type admin for username and password then click on sign-in.
- On the next page, set your WiFi SSID and password and tap on the Setup Node option.
- This will automatically set the node as the Parent’s node.
- Once it is done, click on I’m done adding nodes.
Now the parent node setup is successful. The next step is to set up an internet connection. Follow the steps
- Now again, open any web browser and search “https://myrouter.local/”.
- You will visit linksyssmartwifi.com:52000/ui/1.0.99.198962/dynamic/Velop/blocking.html#m.
- In the next step, tap on “Continue to Linksys Smart Wi-Fi”.
- Insert admin in the router password to sign in.
- As you reach the next page, click on the CA option at the last corner.
- By visiting the dashboard, go to internet settings, and configure this process by choosing the internet connection type.
- The parent node’s light will turn blue by making the internet connection successful.
- To add the child node in the setup, place the child node closer to the parent node.
- Combine the child and parent nodes by using an ethernet cable and go to the Add Wired Nodes option.
- After adding the child nodes, click on OK.
Finally, the Linksys Velop Setup and internet connection procedures are completed.
Linksys Velop AC2200 Setup on iOS Device
The Linksys Velop AC2200 setup configuration process can be done easily using the Linksys app on iOS mobile. However, the iOS and Linksys app versions should be the latest for effective completion of the process. Go after the down-written tips
- To begin with, install the Linksys app on your iOS mobile.
- On the other hand, turn ON your node and wait till it shows a solid purple color.
- Set up the new WiFi network in the app.
- Then, select the Whole home mesh WiFi and turn on Bluetooth of iOS mobile.
- In the next step, tap It’s plugged in.
- Click on Next after the plugging.
- Place your node, click next, and click It’s in the open.
- Follow the instructions and click once It’s connected.
- Once it is connected, the setup will search for an internet connection.
- Now, log in to the Linksys cloud account, and if you don’t have then create a new one.
- Wait, till the linking is done between the node and your account.
- Enter your WiFi name and password in the field.
- Lastly, choose the location of the node and click next.
- Thus, you have done the Linksys Velop AC2200 Setup successfully.
Linksys Velop AX4200 Setup on Android Mobile
Setting your Linksys AX4200 up on any Android mobile is a straightforward process.
Along with an android mobile, you will need just an ethernet wire, a WiFi router, and a Velop node. Utilize the below-listed points
- Join the Velop node to your WiFi router via an ethernet cable.
- Open the play store on your mobile and launch the Linksys app.
- Create a Linksys Velop WiFi account on the app.
- By doing some basic things, connect your device’s WiFi to the Velop setup from the WiFi list.
- Insert the Velop’s password and the connection will be done.
You can set up the different Velop nodes as parent or child nodes. The parent node must be connected to your router via an efficient ethernet cable. Then, the child nodes can be linked with other nodes using wire or wirelessly.
How to set up Linksys Velop AX4200 on PC?
You can make use of a PC or laptop’s web browser to configure the Linksys Velop AX4200 setup. Just ensure that your device and the web browser you are going to use are updated to their latest version. If you are using the Velop on the app then reset it to make it on its factory default settings. Here are the rest of the steps:
- Turn on the Linksys Velop Setup first.
- Then, Connect your device to the WiFi by typing the WiFi password.
- Open any web browser on the device and type the IP address that is 192.168.1.1 and search.
- You may face an error here, but resolve this by marking the Accept the Risk and Continue options in the setting.
- Then, enter the admin as the router’s access option on the screen page.
- After visiting the dashboard, click on the CA link.
- Now, click on the CA router setup under the connectivity option.
- Create a WiFi name and password, and tap on the Setup Node.
- Check once, if the WiFi name connects to it.
- After that, you will see Your Master Node is Configured message.
Hence, the Velop is now online and is in working condition.
Consideration Points While Linksys Velop Setup
Although all of the setup approaches are easy to perform you can execute them by following the points carefully. However, you must use some consideration tips that will enable you to have a successful setup. These are:
- First of all, Verify the connections between the Velop parent node, modem, and your device before you move to setup.
- Choose the ideal placements for all of the devices while configuring your Linksys Velop. In case you can not find an appropriate place then you can use the Spot Finder feature of Linksys.
- Select the official network of your Linksys Velop while making a wireless connection to your device.
- Try to keep disconnecting the child nodes while you set up the parent node.
- Set up the child nodes in the same way as you configure the Velop parent node.
- Ensure to use the default details as they are and follow the points exactly shown on the screen.
Linksys Velop User Guide/ Manual
Linksys Velop User Guide or Manual is an installation and login assistance for users. This small booklet comprises lots of crucial information regarding the product’s features, functions, and procedures. Read this guide carefully to acquire in-depth knowledge of the product and how its features work. There are also complete details on Linksys Velop Login, Setup, and Troubleshooting procedures. These are mandatory procedures and users need to complete them. Without completion of these procedures, you may not be able to make full use of the high-speed Linksys Velop network.
We recommend you follow the Linksys Velop Manual instructions for the login, setup, and troubleshooting to get rid of any issues that you may be facing. Or, if it is a little complex to understand the diagrams and instructions provided in the user manual, connecting to our Linksys Customer Support experts will be a better choice for you. They will first understand the actual problem in your Linksys Velop device and then come up with an accurate solution. So, consider Linksys Velop Manual, but if that does not help, do not hesitate to connect to our team.
Troubleshooting Linksys Velop Setup
In case, you find any issues while using the Linksys Velop Setup, consider and follow the tips that are written below.
- Check the router’s working and internet connection.
- Analyze the LED indicator on the top of the node.
- Do the ethernet wire connection again.
- If still you are facing errors, then opt for the reset function.
- There is a reset button at the bottom of the Velop.
- Press that button for almost 10 seconds.
- The light on the node will turn red and get dim in several pulses.
- Hold the button and wait until the light turns bright red.
- Finally, after resetting the node, all the previous settings will be deleted. Now, do the Linksys Velop setup process again.
Linksys Velop Mesh Firmware Upgrade
Updating the Linksys Velop firmware is a convenient way that solves a number of performance problems. So, always enable the auto-upgrade firmware option in the Linksys app. In case you want to do it manually, there are mainly two options available to you. The first one is by using a particular link and another is by CA login. Go through these two ways separately.
By a Particular Link
To use this method, verify if your node is configured or on its factory default settings. Note down the IP address of the node which will be 192.168.1.1. Read the written instructions for more details
- First, download the firmware file of your product on a PC or laptop.
- Now, if the node is configured then open any web browser, and type “http://IPaddressfupdate.html” in the search bar. Use the IP address of the node.
- And, if the node is on its factory default settings then, search for “http://IPaddressfupdate.html”.
- Thereafter, a sign-in page will appear on the screen. Insert the username and password and click on sign-in.
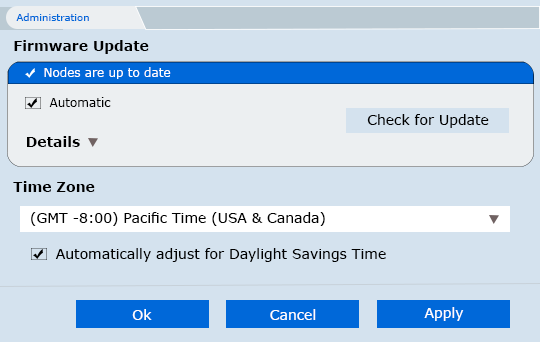
- After visiting the firmware upgrade page, choose and upload the firmware file, then click on Update.
- Wait till the update is done.
- After the update, the configured node will show a solid blue light by making it online.
- But the factory default settings node will reflect a solid purple light indicating that it is ready to set up.
- Try performing the Linksys Velop Setup again.
By CA login
If you choose the CA login process, there will be two different methods for distinct nodes i.e. for the parent node and the child node. Utilize the listed below points to do this
- Download the product’s firmware upgrade on your computer.
- For the parent node, log in to the Linksyssmartwifi.com page and insert Linksys cloud account details.
- For the child node, search “http://LANIPaddress/ca.
- After getting the page, click on the CA option at the bottom right corner page.
- Tap on the router settings and then connectivity.
- Upload the firmware file and click on the start button.
- Wait for the update to finish.
- Once it is done, click on the router reboot window.
- The thing to remember is that do not let the router and computer turn off during the update.
Verify The Speed of Linksys Velop WiFi
Checking the internet speed while using the Linksys Velop setup should be a consideration. By doing this, you can analyze the working of Linksys Velop setup. The interesting fact is that you can even examine the speed on the Linksys smart app.
Open the app on your device and tap on the three lines menu icon on the upper-left of the screen. Select the Speed check option from the list. After the test completion, you will see the upload and download speed rate results. Besides that, there will be one ping option and one result description at the bottom
Linksys Velop WiFi Mesh Bridge Mode
Using the Bridge mode through the Linksys Velop setup is the most lucrative thing along with others. When you apply the bridge mode, all your nodes and other WiFi-connected devices will follow the same network. You can use the bridge mode by following two different ways. Read the points to utilize this feature
Via LinksysSmartWiFi.com Web Page
- On your PC or laptop, search Linksyssmartwifi.com.
- As you get on that page, insert the Linksys cloud account details to sign in.
- Tap on connectivity in the router settings.
- Next, edit the internet settings and choose the Bridge mode.
- Lastly, save this setting and click OK.
By Using The Linksys App
- Open the dashboard in the Linksys app, and go into the menu.
- Then, tap on the internet settings by following the advanced settings.
- Go under the connection option and select Bridge mode and save it.
- After that, click on Enable Bridge Mode to run this feature.
- In the end, the dashboard screen will display that the node is in Bridge mode.
Ultimately, In no time at all, the Bridge mode setup will be done.
Common Linksys Extender Setups
Some Issues You Might Face
Frequently Asked Questions
Users can do the setup process of Linksys Velop in some easy ways. You will require a few things i.e. an ethernet cable, a WiFi router, and any device with Linksys smart app. Join the router and Velop node via ethernet wire and use the Linksys app to make the connection.
You can check the firmware version on Linksys smart app by clicking on the Network administration option. However, to update the firmware version, you can use any one of the two options which are CA login or a specific link.
The Linksys Velop contains a number of holes that provides ventilation to the nodes. These holes sort out the overheating issue by ventilating it during usage.
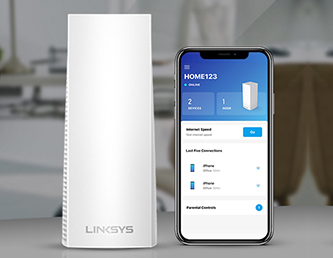
The Linksys smart app contains a lot of product features including spot-finder and beamforming technology. Additionally, it provides Guest WiFi access, parental controls, Linksys shield, and network security on subscription, More than that, the smart app has speed check and Supports Apple Homekit features.
In case the Linksys app gets stuck, do the Linksys Velop setup using a web browser. Open a web browser on your PC and search 192.168.1.1. Then, enter the admin as the password to sign in. Click on CA router setup in the connectivity and create a WiFi name and password and click OK. It will get done this way.
To fixes the Linksys Velop errors, check the router and internet’s working. Analyze the LED indication and fix that accordingly. If needed, do the setup again. If it’s still not working, then use the reset function.
The different light indicators on the node give you, unlike information. Go through the distinct LED color notifications
| Blinking Blue |
This means the node is powering on. |
| Solid Blue |
Connected to the internet. |
| Blinking Purple |
The node is doing the setup. |
| Solid Purple |
Ready for setup. |
| Blinking Red |
Your node is out of range. |
| Solid Red |
No internet connection. |
To finds the IP address of the node, go to the network administration under the dashboard in the Linksys app. Tap IP details to check your node’s IP address.
The bridge mode in the Linksys Velop WiFi mesh setup allows you to extend your existing networks. In simple words, it creates a bridge between the network and the Linksys Velop setup which permits them to communicate with the network’s other devices.