Linksys RE9000 Setup
Live Chat
Live Chat with our experts & get real-time answers to all your queries.
Any Query?
Call us to discuss your Linksys issues with our experts and get the solution.
The Linksys RE9000, an extender with robust technology features, can cover the WiFi dead spots even at your bigger place. Whether you want it for your office work purpose or to improve your house’s WiFi network, this device can be a preferable option. So, get this device carefreely and read this information to make it ready for use in a quick and easy way.
Different Approaches For Linksys WiFi RE9000 Setup
There are mainly two ways to do the Linksys RE9000 setup such as in the Range Extender mode and Access Point mode. Both ways will allow you to avail of the extender’s features optimally, but you will require to set it up perfectly. So, check out the setup methods precisely and use them appropriately.
Ensure To Collect These Items
Before you begin the Linksys extender setup RE9000, make sure to have these things with you. Such as:
- Your existing dual-band WiFi router.
- The name of your router and its WiFi password.
- The Linksys extender’s login and other credentials.
- Any device with the capability to have WiFi and ethernet ports.
- Your extender should be on the factory default settings.
- If that is not, then make it by pressing the reset button.
- Lastly, an ethernet wire to attach the extender and router.
RE9000 Setup As Range Extender
In the first and foremost method, set up your linksys extender after attaching your device wirelessly to its network. Take your extender and a WiFi device to move further with the setup process.
- Plug in the extender to the power socket and turn the switch on.
- Once there is an orange light on the extender, jump to the second point.
- Take your computer or smartphone and connect it to the extender’s network.
- Then, launch the web browser and insert the web address extender.linksys.com in the search field.
- If the web portal is not accessible, use the IP address instead of the web address.
- Your device browser will redirect you to the Linksys RE9000 setup page.
- Once you will be there, choose the Start Setup option.
- At this point, choose your connection type whether that is wired or wirelessly.
- Also, select the setup option from the Range Extender and Access Point options.
- Click on the first option which is the Range Extender mode and choose the network from the next page.
- Here it will scan only for the 5GHz network by default, so click on the connect option.
- Thereafter, the screen will prompt you to fill in the network password and click enter.
- Thus, the Linksys RE9000 extender setup will complete here in this way.
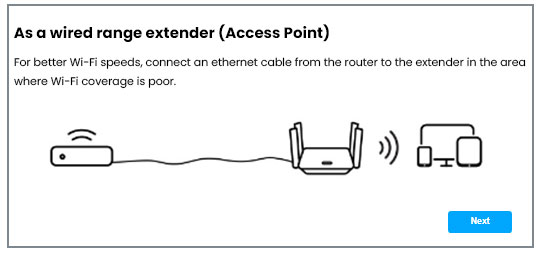
Setup As Access Point
In the second setup method, you can choose the network as the Access Point and can configure it in the same way.
- Connect your extender and the router using an ethernet wire.
- Make sure both devices are plugged into the closest power sockets.
- Take your networked WiFi device and open your preferred web browser.
- Access the setup window by searching the default web or IP address.
- Now, tab the “ As a wired range extender” Access Point option.
- Next, create a network name and set the new password, and click Change.
- Change the admin password of the Linksys extender and save settings.
- Finally, you will succeed in the Linksys RE9000 setup process.
Relocate The Extender
Once you are done with the Linksys RE9000 setup, change the extender’s location and place it in the WiFi dead zone. Here you can use the Linksys Spot-Finder feature to get the best placement suggestion for your extender. Click on this option from the web management page and later choose Find Better Location. Meanwhile, try moving your extender to a different place and pick the best placement.
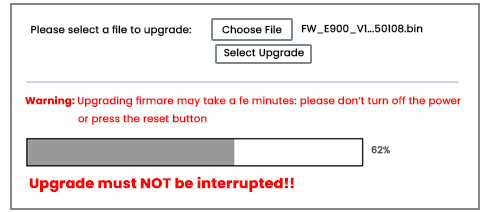
Update The Extender’s Firmware
From now, the Linksys extender will start amplifying the existing internet signals. However, to keep it working flawlessly and avoid errors, check for the firmware updates of the extender. Visit the Linksys web portal and see if there is any new version available or not.
Download the latest available version and use the screen directions to carry out the updating process. Reboot the extender finally if there is a requirement and connect your devices to it.
Troubleshoot The Extender Errors
While using the extender, in case you start getting slow working or any other issues, check the network’s settings. Verify that the installed settings are in the right sequence or not. Ensure there are no signal-absorbing things closer to the extender that can interrupt the performance.
If the error still persists, then try resetting the configured settings to remove the issue. Locate and press the dedicated reset button from the extender’s panel and hold it to see the blinking light. Wait for a few minutes or till you see the stable light, and reconfigure the RE9000 extender lastly.
Confirm that the working error is fixed and the extender is performing well now. If it is not, then don’t hesitate to reach our technical experts to take more guidance. Contact us immediately and get your error fixed in less time.